Backing up and parking our RV might be my least favorite part of camping. It takes time, practice, and knowledge of the RV’s angles. Plus, I’d rather go camping than spend time backing up, but it’s just one of those RV skills that is necessary. It’s all the more reason to test Camping World’s Trailer Life Pathway Wireless Backup Camera System. Today’s RVs typically come back-up camera ready or already have a wireless RV rear view camera installed.
Our fish house RV has neither, making it the perfect RV to test the new backup camera. Here’s what we love about the Trailer Life Pathway Backup Camera.
Easy Installation

One of the main advantages of the Trailer Life Pathway Wireless Backup Camera System is its ease of installation. The camera has simple instructions, making it easy for even a novice to install. That means we’re saving time and money, as we don’t have to hire a professional to install the camera.
We did have to drill holes in our RV to access the wires attached to the running lights. We aren’t big DIY people, so the fact that we figured out how to do this and successfully installed the backup camera impressed me.
Improved Safety
I’ve grown so accustomed to having a backup camera on our vehicle. Having one on our RV is a game-changer. I feel much safer now because the camera lets us see areas behind the RV that we normally can’t.
It ultimately makes it easier to back up and park safely, especially if I don’t have someone guiding me. Getting that extra visual will help prevent accidents and damage to our RV in the long run.
Wide Viewing Angle
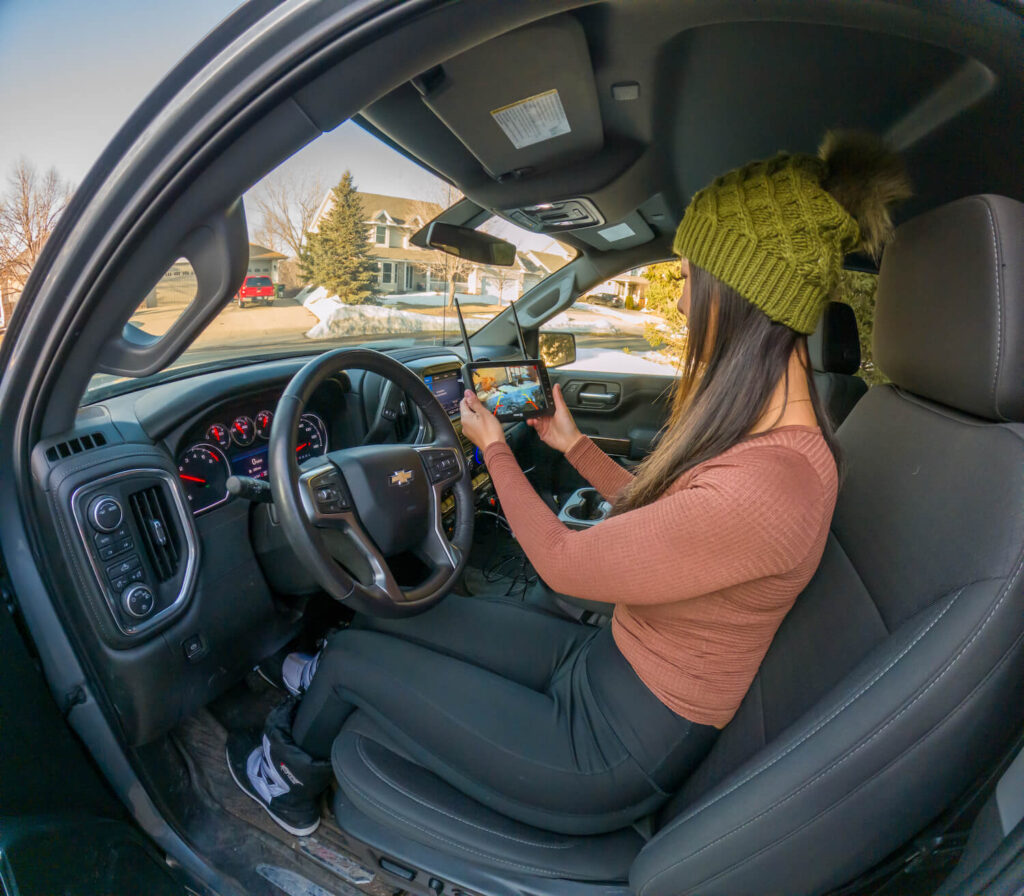
The Trailer Life Pathway Wireless Backup Camera System boasts a wide viewing angle, which allows us to see more of our surroundings. This feature is especially useful when backing up in tight spaces or maneuvering in crowded areas.
Excellent Range
One of the main advantages of the Trailer Life Pathway is its far-reaching range of 984 feet. The camera shows a crisp, clear picture on the monitor, and even larger RVers shouldn’t run into any issues with range.
Night Vision
The camera also has night vision capabilities, which means we can see what’s behind our camper even in low-light conditions. We found the night vision capabilities acceptable but not super clear, which is fine for our needs since we typically don’t travel at night.
Affordable
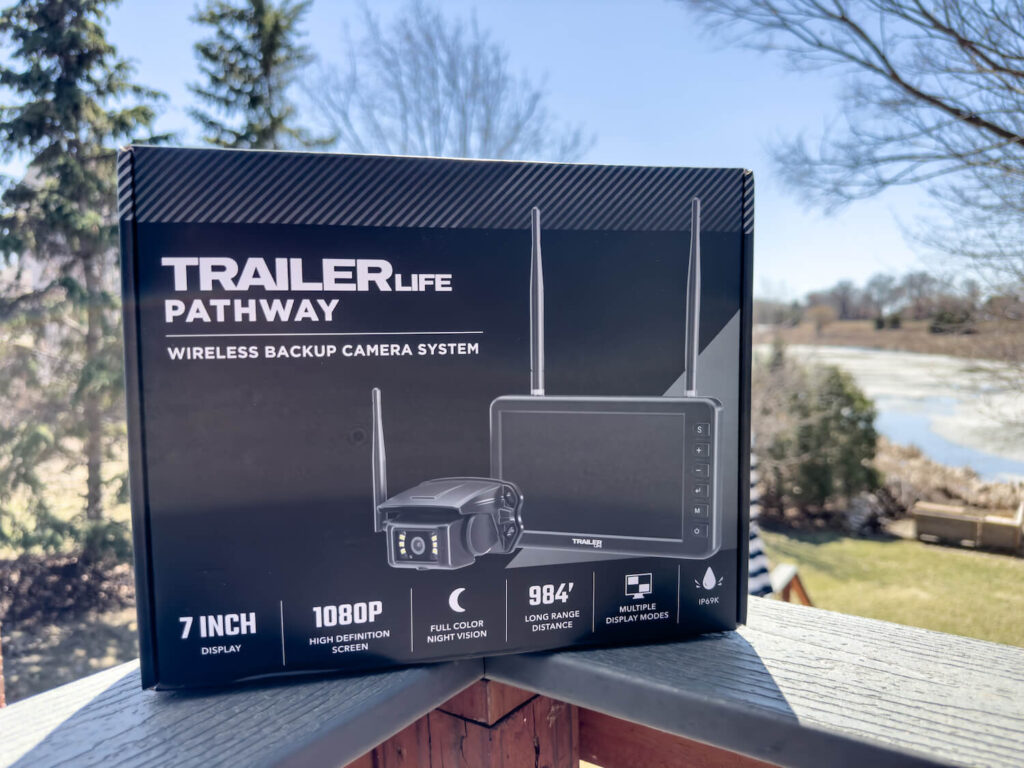
The Trailer Life Pathway is relatively affordable compared to other RV backup camera systems. This makes it an attractive option for RVers who want to improve their safety and convenience without breaking the bank.
The Trailer Life Pathway Wireless Backup Camera System is already helpful for our camping adventures. It’s an affordable tool for RVers who want to improve their safety and convenience while on the road.
Trailer Life RV Backup Camera Installation
The installation is easy if your RV already has a backup camera or is prepped for one. Your RV backup camera will come with a step-by-step installation manual, but here’s a quick summary:
1. Sync the camera to the display.
Start by mounting the antennas to the display and the backup camera. Then, connect the 12-volt power cord to the pairing cable. This supplies power to this display and camera. The display should turn on and reflect a live feed.
2. Mount the display.
The Trailer Life Pathway Backup Camera has two mounting options: a center console mount with a 3” adhesive pad, or a suction cup mount. This allows you to mount the display where it’s most convenient, based on your vehicle’s dash design.
Safety tip: Check your local guidelines for dash-mounting regulations to ensure proper visibility while towing.
3. Ensure a safe installation environment.
Your trailer’s tires should be secured with wheel chocks before installation. It should also be leveled and stabilized properly to ensure your safety while you’re up a ladder completing the rest of your installation.
Here’s our tutorial on how to level a camper properly.
4. Remove the old camera or camera prep cover.
Check the screws used to mount your old camera or prep cover and find the appropriate bit to remove them correctly. With that bit in hand, remove the old camera or cover and disconnect before removing the backer plate.
5. Install the new camera.
Use the Trailer Life plug-and-play wiring adapter to connect the new camera to your RV’s backup camera prep wiring. It’s a good idea to test that the camera connects to your tow vehicle’s display before using four screws to install the backer plate, which secures the new camera.
Technician Tip: To power your backup camera, your trailer’s 7-pin electrical connector must be plugged into your tow vehicle. You may also need to turn your vehicle’s lights on.
6. Adjust the antenna and test the camera.
Trailer Life recommends positioning the antenna to point up and away from your RV. After completing that step, find a partner to check the display in your tow vehicle. They can help you adjust the camera angle up or down to display the optimal view.
You should also check that your display shows at least three connection bars. If you don’t, adjust the antenna’s position until the desired connectivity is achieved.
Not sure if you want to complete this installation on your own?
With your new backup camera installed, enjoy easier navigating into campsites, parking lots, and driveways. Plus, it’s easy to remove and re-install if you ever decide to upgrade your RV! Check out the following resources for more information:
- Furrion RV cameras
- Shop for an RV backup camera
- Check out these camper upgrades
- Other Backup Cameras for RV Navigation
Do you have any questions about this backup camera and how to install it? Let us know in the comments below.


I still can,t sink my camera
Hi Frank!
Have you tried contacting our Service Team?
I need a replacement antenna one of mine broke where it screws into the monitor
Hi Dennis!
A Retail Specialist at your local Camping World should be able to help! https://cwrv.link/bcwlocations
What side marker light cameras are compatible with the trail life rv rear camera system?
Hi George!
There’s not currently a side marker camera system available from Trailer Life. If your RV is prepped for side marker cameras, you’ll need to match the camera brand to the prep manufacturer. If not, you can explore Furrion cameras.
If it helps, we’ve also detailed the process for installing Furrion backup and side view cameras.
Is there a way to pair it with the screen of the truck or does it have to be used with the screen it comes with.
Hi Cassie!
This wireless backup camera requires its own display monitor that it comes with. If you’re searching for a camera that can sync to your vehicle’s in-dash screen, you can contact our RV parts experts at your local Camping World (https://rv.campingworld.com/locations) or contact your vehicle manufacturer.
Hope that helps!
My camera is paired and all works fine except the menu buttons don’t work if the camera is on. If I turn the camera off and turn the monitor off and back on I can use the menu buttons. What is wrong?
Hi Jim!
I’d recommend reaching out to our technical service hotline to speak with someone that can provide additional troubleshooting tips. Here’s their number: 1-866-838-5304
Would like to get an each camera, do they just sell a camera. If how and where please. Thanks
Hi Gregory!
You can explore selection of Trailer Life backup cameras.
Hope that helps!
Help!! We got a new TT today and had the dealership install the trailer life pathway backup camera and the 2 side cameras. Only the passenger side camera is displayed on the screen and none of the buttons work on the display.
Hi Beth!
I’m really sorry to hear this!
Can you please email our corporate customer service team at cs****@**********ld.com so that they can look into this and help troubleshoot your issue?
Can this camera be paired to a phone ?
Hi Jason!
Unfortunately that capability isn’t one of the features of this camera. But this Hopkins VueSmart Trailer camera does offer it.
Hope that helps!
I want an extra camera for a second camper but I can’t find one. I’m not sure what other brand cameras would work. Since I can’t find who manufactured this, I have no way to contact them.
Hi Flip!
What is your camper’s make/model? The best resource for information on fit and installation requirements for this camera is likely your local Camping World. Here’s where you can find the location nearest you: https://rv.campingworld.com/locations
I’d recommend reaching out to their parts department. Hope that helps!
I purchased and installed this camera. In the driveway it worked great. I went to use it for the first time on a trip and the camera would not show on the display. Do you have to pair the camera each time you use it for a trip?
Hi Daniel,
I reached out to our technical service team to get their take on your question and here’s their reply:
The system has flash memory powered by capacitors. They are similar to batteries, but not intended for long term storage. If the system is left unpowered for a certain length of time, that power fades away and the pairing memory will be lost. How long is too long varies between manufacturers. Powering up and turning the system on periodically just as a part of routine maintenance may resolve these issues.
Hope that helps!
I installed the side marker cameras and at first, one camera paired with the monitor without even having the antenna on. This was before I even connected the rear main camera. Now that all cameras are installed and connected, receiving power, the side markers do not pair. I have tried everything noted in the limited instructions.
The pairing buttons on the side of the cameras have no indication that they are being pressed. No click or tactile indication. Do I hold the so called button down or press and release?
I test them with direct line of sight and 18 feet away – no luck.
Rick, my rearview camera is reverse wire. The vehicles are on opposite sides when I look at monitor. How do I reverse vie
Sorry to hear this Rick!
I’d recommend contacting your local RV service center to see if they can provide additional troubleshooting tips. Here’s where you can locate the center closest to you: https://rv.campingworld.com/rv-service-maintenance#js-anchor-locations
Hope that helps!
Why is the menu on the monitor not operational when the camera is on? I am trying to make connections to the rear camera and the second side marker camera. I synced the rear camera as instructed, it showed up originally but now it wont show up and i cant seem to sync the second camera. I am very frustrated
Hi Michele!
It sounds like either the camera is too far out of range from the monitor, so maybe adjust the antennas up or sync both again. And also make sure that the camera is getting power. That seems to be the number one issue with these units. You can always bring it into your local Camping World as well and have them check it out: https://rv.campingworld.com/rv-service-maintenance
What is your travel trailer has no camera in the rear and this will be a new install. Can this be done with this camera? And where in the back? Will it take the middle light in the rear top?
Hi Patricia,
If your trailer is prepped for a backup camera, the Trailer Life camera will install where that prep is located based on the manufacturer’s decision. Like on Jenny’s trailer, this is usually centered in the middle of the trailer’s back wall.
What is your trailer make and model?
If your trailer isn’t prepped for a backup camera, I’d recommend contacting our Performance & Improvement Center to discuss the additional wiring work that will be required to install the Trailer Life backup camera. Here’s a link where you can find contact information for the center nearest you: https://www.campingworld.com/performance-centers.html
Hope that helps!
What about my pre mounted Furrion camera base on the back of my 2021 Forest River Flagstaff Classic? Will that work? Do you review those cameras as well? Thanks
Hi Trevor!
I’d check directly with your RV’s manufacturer your owner’s manual to confirm the compatibility of this backup camera. Here’s another article we have on backup cameras and we certainly hope to review a Furrion model in the near future: https://blog.campingworld.com/gear-and-accessories/the-best-wireless-backup-cameras-for-rvs/
Hope that helps, but let us know if you have any follow up questions!
Got that.
I would like to buy 1 extra back up camera to mount in the bed of my truck for the hitch alignment.
Hi Ronald!
You can shop our selection of RV backup cameras.
Or see if you have a Camping World retail location near you so you can head in and speak to a sales rep about the best camera for your setup: https://rv.campingworld.com/locations