IF YOU’RE NEW to RV ownership, or you’ve ever been jolted awake by an RV alarm you didn’t understand, this guide to RV safety systems is for you. RV safety equipment is built into your rig to protect you, your passengers, and your investment from fire, toxic gases, water damage, and electrical hazards. Understanding how these safety devices work and what they’re telling you when they sound could literally save your life.
Key Takeaways
- Every RV is equipped with safety systems covering gas detection, fire suppression, electrical protection, and water pressure management. Each one requires regular inspection and maintenance to remain effective.
- Your LP/CO detector, smoke alarm, and fire extinguisher all have defined replacement timelines. Ignoring these schedules can leave you with a false sense of security.
- Enabling your battery disconnect switch turns off your hardwired LP/CO detector, which means “Store Mode = Safety Off”. Every RV owner should understand this before leaving their rig unattended.
Why RV Safety Systems Are Different from Your Home’s
RV safety equipment faces challenges that residential systems never encounter. Road vibrations, extreme temperature swings, the constant movement of a 12-volt electrical system, and other constraints all demand RV-specific solutions.
A smoke alarm rated for your home’s living room is not rated for your RV bedroom. An extension cord that works fine in your garage can be a fire hazard when plugged into your camper. This is why NFPA standards, RVIA requirements, and RV-specific product certifications exist. It’s also why all RV owners — new and experienced — should understand them before they need them.
Let’s walk through every major RV safety system, starting with the propane supply and working through detection, suppression, electrical protection, and water management.
RV Propane Safety Systems
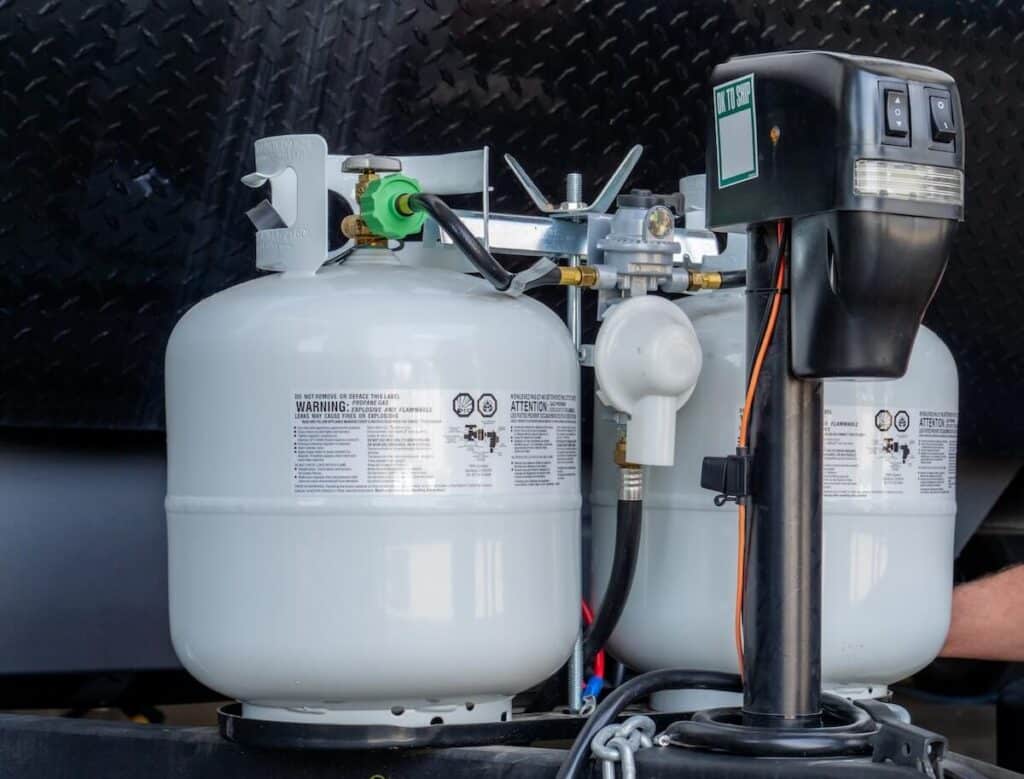
The LP regulator is the foundation of propane safety in your RV. Whether you’re in a motorhome with a built-in LP tank or a towable camper with propane cylinders, your entire propane system depends on this single component functioning correctly.
Propane is stored at high pressure inside your container(s). The regulator’s job is to reduce that pressure down to a safe, consistent level that your cooktop, furnace, water heater, and other appliances can use. Without a functioning regulator, propane would reach those appliances at dangerously high pressure.
Single-Stage vs Two-Stage (Automatic Changeover) Regulators
For RVs with a single LP container, a single-stage regulator handles the pressure drop from the container to the appliances. But for towable campers with multiple propane cylinders, you’ll typically find an automatic changeover regulator. This device monitors the supply and, when the active cylinder runs low, automatically opens the line from the backup cylinder so your appliances keep running without interruption. Of course, this relies on the valves on both cylinders being fully opened.
You can usually tell which cylinder is active by the indicator window on the regulator: green typically means the active side is still supplying gas, while red signals that the regulator has switched to the backup side and it’s time to refill or swap the depleted cylinder.
Technician Tip: When connecting propane cylinders after a refill, open the valve slowly to allow the regulator to equalize pressure gradually. Opening it too quickly can trigger the excess-flow valve inside the regulator, temporarily cutting off gas flow and leading you to think you have an empty cylinder when you don’t.
A failing LP regulator can cause a yellow or orange flame on your cooktop burners (should be pure blue), inconsistent appliance operation, or, in the worst case, a gas leak. If you suspect your regulator is failing, have it professionally inspected before your next trip.
RV LP/CO Detectors

Usually found beneath the kitchen counter or near the refrigerator, the combination carbon monoxide and propane leak detector is one of the most critical safety devices on your RV.
This single device simultaneously monitors two different invisible threats, and its placement is not arbitrary.
Why Placement Matters
Propane (LP gas) is heavier than air. If it leaks from a fitting, hose, or appliance connection, it sinks and pools near the floor. NFPA standards require the LP sensor in an RV detector to be mounted within 20 inches of the floor for this reason.
Carbon monoxide behaves differently. It’s approximately the same density as air and disperses more evenly throughout the interior space. But because priority is given to the heavier-than-air LP gas hazard, keeping the combined detector low effectively covers both threats.
One more thing about placement: keep the detector away from entry doors, floor vents, or ceiling fans. Drafts can disperse leaking gas before it reaches the sensor, potentially delaying the alarm during a slow leak.
Understanding Alarm Sounds and LED Colors
When your LP/CO detector is triggered, it emits an audible alarm and often flashes an LED indicator. Unfortunately, these signals are not standardized across brands.
This is why the first thing you should do after moving into a new-to-you RV, or replacing this detector, is read the instructions for your specific detector. Understanding the difference between the “CO alarm” pattern and the “LP alarm” pattern before an emergency is critical, because your response to each is slightly different:
Propane alarm: Immediately turn off the propane supply valve at the container. Open windows and doors. Get everyone out and don’t operate any electrical switches (including lights) until you’re sure the LP has dissipated. Contact an RV technician to identify the source of the leak.
Carbon monoxide alarm: Get fresh air immediately. CO is produced by incomplete combustion in any fossil-fuel appliance — your furnace, generator, or even a nearby vehicle. Unlike propane, you can’t smell CO, which is why the detector is so important.
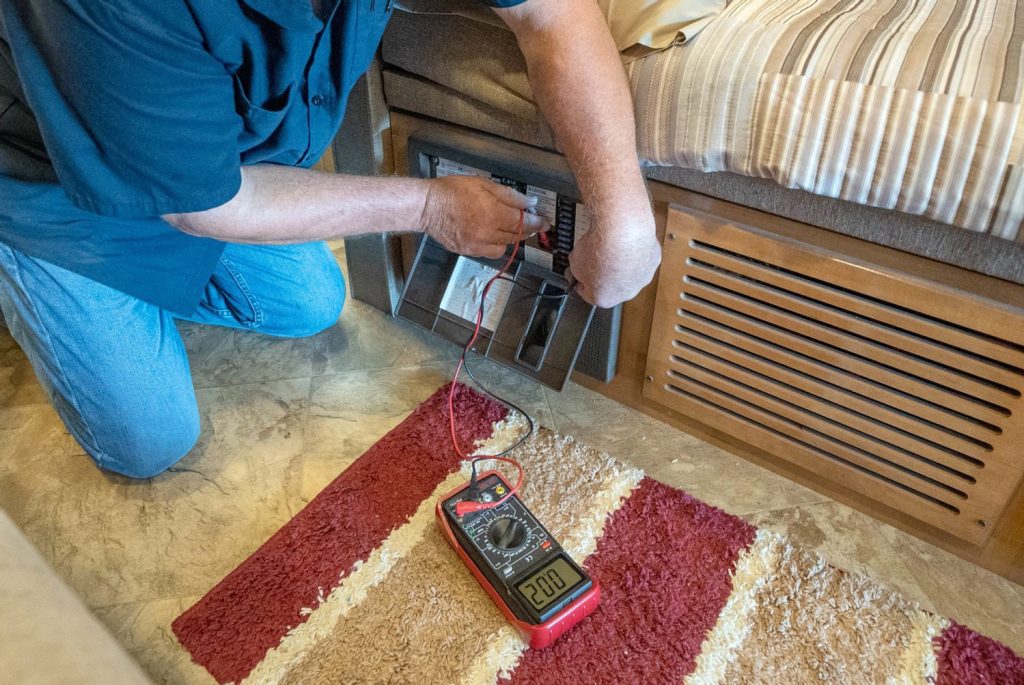
Battery Voltage and “The Chirp”
Because RV LP/CO detectors are typically hardwired into the RV’s 12-volt electrical system, they are sensitive to battery voltage. Most units operate reliably above 11.6 volts DC and remain functional down to approximately 10.6 volts. Below that threshold, you’ll hear one chirp per minute. This isn’t because of a gas leak, but because the detector doesn’t have enough voltage to operate properly.
This matters especially when you use your battery disconnect switch to prevent parasitic drains during storage. When the disconnect is engaged, the LP/CO detector loses power and effectively shuts off. Remember the rule: “Store Mode = Safety Off”. If you’re leaving your RV unattended for an extended period, be aware that this safety system is offline.
Technician Tip: Many modern digital control systems specify 11.6 volts DC or higher, so this is the safest recommendation. If you start your campout at 10.6 volts DC and assume you’ll be fine because you are strictly speaking within spec, you are too close to failure to safely rely on it. There are still many battery-powered models that run on 9-volt and 1.5-volt AA batteries. The minimums for these would be 8.4 volts and 1.3 volts, respectively.
When to Replace Your LP/CO Detector
These devices don’t last forever, and you won’t always know when they are no longer working. Most LP/CO detectors are designed to beep five times per minute as they approach the end of their life. The industry-standard replacement interval is every 4 years, as electrochemical CO sensors and semiconductor LP gas sensors degrade over time. An old sensor may fail to alarm even when gas concentrations are at dangerous levels.
Check the manufacture date on the back of your detector. If it’s been four years or more, replace it before your next trip. It’s a small cost compared to the risk.
RV Smoke Alarms
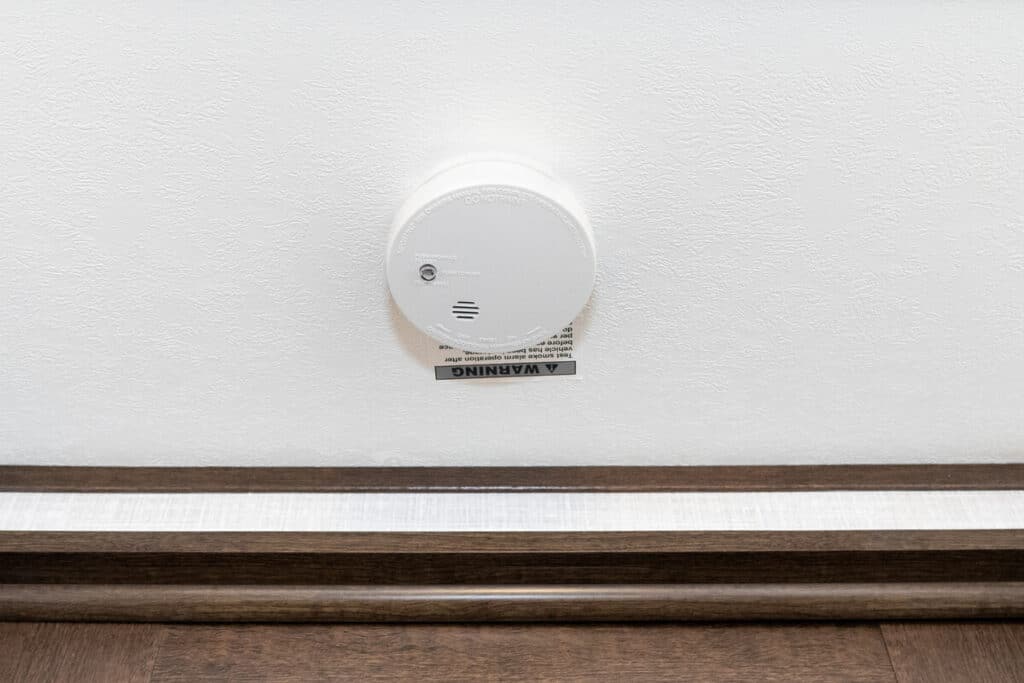
While your LP/CO detector monitors for dangerous gases, your RV smoke alarm is designed to detect smoldering and fast-flaming fires. And like the LP/CO detector, RV smoke alarms have specifications that serve a purpose.
Why Smoke Alarms Must be “Listed for RV Use”
Residential smoke alarms are designed for a stationary environment with relatively stable temperatures and minimal vibration. Your RV experiences none of those conditions. Road vibrations, temperature swings, and the physical movement of driving all put stress on alarm components that a home unit was never built to handle.
This is why NFPA standards specify that RV smoke alarms must be “Listed for RV Use.” These models are tested to withstand the mechanical stress of travel and the temperature extremes of a camping environment. Installing a residential smoke alarm in your RV is not a compliant substitute, even if it’s the same brand and looks identical.
Power Sources and Maintenance
Unlike hardwired LP/CO detectors, most RV smoke alarms are battery-powered. Battery types vary by model and may include 9-volt, AA, AAA, or sealed lithium cells. A few models are hardwired, with battery backup.
Regardless of power source, here’s your maintenance checklist for the smoke alarm:
- Test monthly using the test button.
- Replace batteries at least once a year (or as soon as the unit chirps to indicate a low battery).
- Vacuum or blow out dust from the sensing chamber every 6 months. Dust buildup is a common cause of nuisance alarms.
- Replace the alarm per the manufacturer’s recommendation, typically every 8-10 years.
Your annual trip prep is the perfect time to run through these checks. Our comprehensive RV road trip checklist includes a safety systems inspection as a standard pre-trip check.
RV Fire Safety Equipment
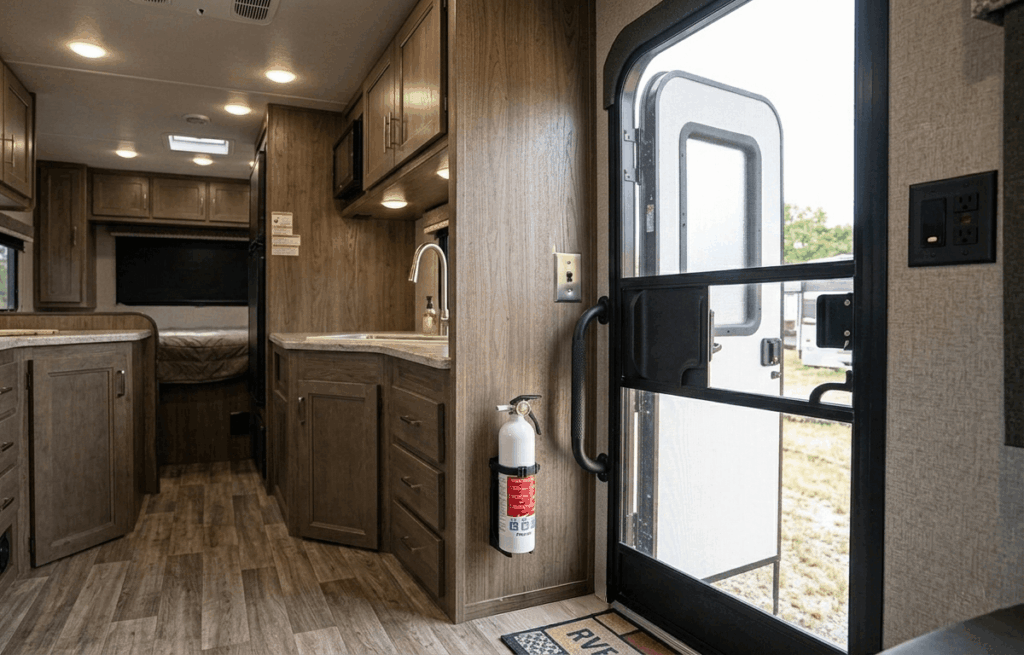
We hope you never have to use it, but if your smoke alarm goes off, your next move should be toward the fire extinguisher.
Federal Requirements for RV Fire Extinguishers
Federal regulations require RV fire extinguishers to be Class 10-B:C minimum, per NFPA standards. This classification is specifically formulated for the two most common fire types in an RV:
- Class B: Flammable liquids (propane, gasoline, cooking oils)
- Class C: Energized electrical equipment
By law, fire extinguishers must be placed within 24 inches of the main entrance or primary escape route. This NFPA requirement is designed to ensure you can reach the extinguisher without going deeper into a burning structure.
The PASS Technique
If you ever pull it off the wall, remember the acronym P.A.S.S.:
- P — Pull the pin. The small metal ring prevents accidental discharge. Pull it fully out.
- A — Aim low. Point the nozzle at the base of the fire where the fuel source is, not at the flames themselves.
- S — Squeeze the lever slowly and evenly.
- S — Sweep the nozzle from side to side until the fire is completely extinguished.
Fire Extinguisher Maintenance and Replacement
Fire extinguishers have a lifespan. Replace yours every 10-12 years from the manufacture date, which is printed on a sticker on the side or back of the unit. Many also include a pressure gauge. If the needle drops into the red zone, the extinguisher needs to be replaced or recharged regardless of age.
Check the pressure indicator before every trip, and once a week on extended stays. And if you ever discharge your extinguisher — even partially — replace it immediately. Never trust a partially used extinguisher to be there when you truly need it.
RV Electrical Safety
Your circuit breakers and fuses are, in their own right, RV electrical safety devices. Their job is to protect every appliance and system “downstream” by interrupting power flow when current exceeds safe levels.
Circuit breakers are designed to trip (switch off) when overloaded. Fuses are designed to blow (burn out) to break the circuit. In both cases, the right response is to diagnose the cause of the overload before simply resetting or replacing.
The most important rule with fuses: always replace with the same type and size. Installing a higher-rated fuse to “fix” a repeatedly blown fuse doesn’t solve the underlying problem. In fact, it actually eliminates the safety mechanism that protects your rig from a wiring fault, a failing appliance, or a dangerous current draw. An improper fuse won’t blow when it should, turning a safety device into a fire hazard.
If you’re experiencing repeated tripped breakers or blown fuses, that’s a signal that something downstream needs to be diagnosed. This troubleshooting guide will help you perform some basic checks if your RV keeps tripping a breaker.
Technician Tip: If your fuse panel isn’t labeled, schedule an electrical diagnostic at your next service visit and ask the technician to label each fuse position. Knowing exactly which fuse controls which circuit will save you significant time when troubleshooting in the field.
RV Water System Safety
Water safety in an RV operates on two levels: preventing backflow contamination and protecting your plumbing from dangerously high incoming water pressure.
Check Valves: One-Way Protection
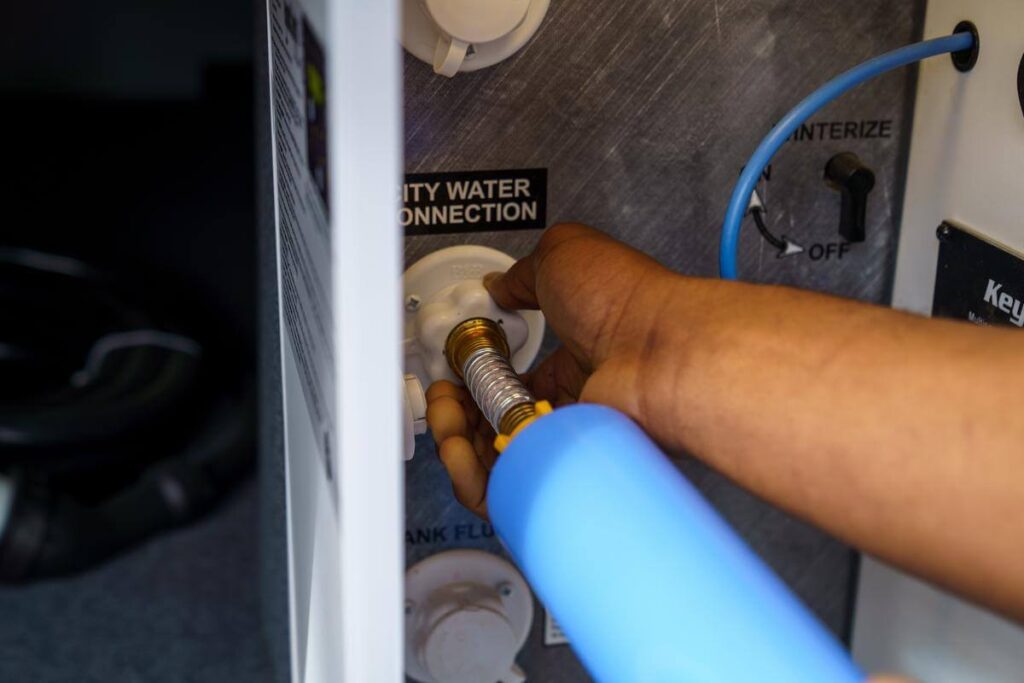
Your RV’s water system includes check valves at two critical points: the city water inlet and the water pump. These valves allow water to flow in a single direction only, which serves several protective functions:
- The check valve at the city water inlet prevents water from flowing backward out of your RV’s plumbing when your water pump is running.
- The check valve at the water pump prevents water from your plumbing lines from flowing back into your fresh water tank when connected to city water.
Together, they maintain pressure integrity and protect the pump and the overall system from contamination and damage.
One critical warning about the city water inlet check valve: never manually depress or probe it. This valve is designed to open only under pressure from an external water source. Physically pressing it open can cause irreversible damage to the valve seat, leading to backflow and expensive repairs.
The Water Pressure Regulator

Every time you connect your RV to a campground city water source, you’re exposing your plumbing system to an unknown pressure. Campground spigots can deliver water at anywhere from 40 to well over 100 PSI. Most RV plumbing systems are not built to withstand sustained high pressure. Cracked fittings, burst hose connections, and leaking water lines are the common consequences.
Installing an aftermarket water pressure regulator between the campground spigot and your water hose reduces incoming pressure to a safe range, typically 40–55 PSI, before it ever reaches your RV’s plumbing. Most experts recommend never allowing pressure to exceed 60 PSI.
For the best protection, connect your pressure regulator directly to the campground spigot, then attach your water filter and potable water hose downstream of the regulator. This ensures that your filter, hose, fittings, and plumbing lines are all protected from the moment water starts flowing.
Learn more in our guide to RV water pressure regulator installation.
RV Safety Checklist to Use Before Every Trip
Run through these RV safety equipment checks before each camping trip:
- LP Regulator: Inspect hoses for cracks or brittleness; verify the flame color on cooktop burners is pure blue.
- LP/CO Detector: Test using the test button; check voltage above 11.6V; verify manufacture date (replace if over 4 years old).
- Smoke Alarm: Test using the test button; vacuum out dust; replace batteries if needed.
- Fire Extinguisher: Check the pressure gauge needle is in the green zone; verify it’s mounted within 24 inches of the main entrance; check the manufacture date (replace if over 10-12 years old).
- Circuit Breakers / Fuses: Inspect panel for any tripped breakers; confirm fuse ratings match original specifications.
- City Water Inlet: Inspect check valve; do not manually depress; attach water pressure regulator before connecting to campground water.
- Battery Disconnect: If using a battery disconnect in storage, remember your LP/CO detector is offline.
Frequently Asked Questions
RV fire extinguishers must meet a minimum Class 10-B:C rating per NFPA standards and must be mounted within 24 inches of the main entry or escape route. This rating covers flammable liquid fires (Class B) and energized electrical equipment fires (Class C), the two most common types of RV fires.
Most LP/CO detectors in RVs should be replaced every 4 years from the manufacture date. The electrochemical and semiconductor sensors that detect these gases degrade over time and will eventually stop reliably detecting dangerous concentrations, even if they still power on. Check the manufacture date printed on the back or bottom of the device.
A single chirp once per minute typically indicates low battery voltage. RV LP/CO detectors are hardwired to the 12-volt electrical system and will chirp when voltage drops below a certain threshold (often around 10.6–11.6V). If you also hear a repeating five-chirp pattern, the unit may be approaching the end of its life and needs replacement.
RV LP detectors must be mounted within 20 inches of the floor because propane is heavier than air and sinks when it leaks. They should be kept away from entry doors, floor vents, and fans, which can disperse leaking gas and prevent the sensor from detecting it at dangerous concentrations.
Using a water pressure regulator every time you connect to a campground city water source is one of the most cost-effective ways to protect your RV. Campground water pressure can exceed 100 PSI, far above what most RV plumbing is rated to handle. A regulator reduces that to a safe range (typically 40–55 PSI) and protects your hoses, fittings, water pump, and appliances from pressure-related damage.
Smoke alarms “Listed for RV Use” have been tested and certified to meet standards for road vibration, temperature extremes, and humidity conditions specific to RV environments. Residential smoke alarms are not certified for these conditions and may fail prematurely or produce false alarms. This is why NFPA standards specify that only RV-listed models should be installed in campers and motorhomes.
More Resources:
- Intro to the Parts of an RV
- RV Propane Hookup Safety
- How To Change RV Water Filters Safely
- RV Fire Safety Tips
Which of these RV safety systems have you had to rely on — or wish you’d known more about before your first trip? Tell us in the comments below.


