PORTABLE waste tanks are ideal for long-term camping with partial hookups, when there isn’t a sewer connection at the campsite, but there’s a dump site at the campground or nearby. Fortunately, learning how to empty a black water tank into a portable tank is easy. It’s similar to dumping camper tanks regularly, but with a few important exceptions. Let’s cover how to dump RV waste into a portable sewage tank.
Key Takeaways
- Waste Transfer: Emptying holding tanks in a portable waste container requires specific hoses and clear connectors to monitor flow and ensure a sanitary transfer.
- Safe Transport: After filling the tote, it can be rolled manually or towed to a dump station at a maximum speed of 5 MPH.
- Sanitation & Maintenance: Once at the dump station, the tank is emptied via gravity and must be thoroughly rinsed with fresh water until the drainage runs clear.
Learn more about the pros and cons of RV sewer totes.
What You’ll Need to Use a Portable RV Waste Tank
Most portable waste tanks for RVs come with the required sewer accessories. For sanitary use, you’ll need the following:
- Disposable gloves
- 90-degree clear double bayonet elbow connector
- 3-foot flexible sewer hose with bayonet and lug storage caps
- Short female-to-female flexible drain hose
- Clear bayonet elbow with a removable 4-in-1 outlet adapter
- Caps with lanyards for each three-inch opening
- Tow adapter
Again, the required accessories are included if you choose a product like this Camco Rhino Waste Tank.
How To Use a Portable RV Waste Tank
Technician Tip: Consult your tank’s manual for the manufacturer’s safe use recommendations.
Wear gloves and any other personal protective equipment (PPE) you prefer when dealing with RV waste. This process differs depending on the number of openings on the tote tank.
If your tank has two three-inch openings, the top opening is your tank fill, and the side opening is for dumping the tank. If your tank has one three-inch opening, use that to fill it, seal it during transport, and empty it into an approved sewer dumping station.
From there, here’s the process for dumping an RV tote:
Technician Tip: Remember that portable RV waste tanks usually hold less than built-in tanks. You may need to empty one tank at a time, or you may only be able to partially empty a tank before moving and emptying the portable septic tank and repeating the process.
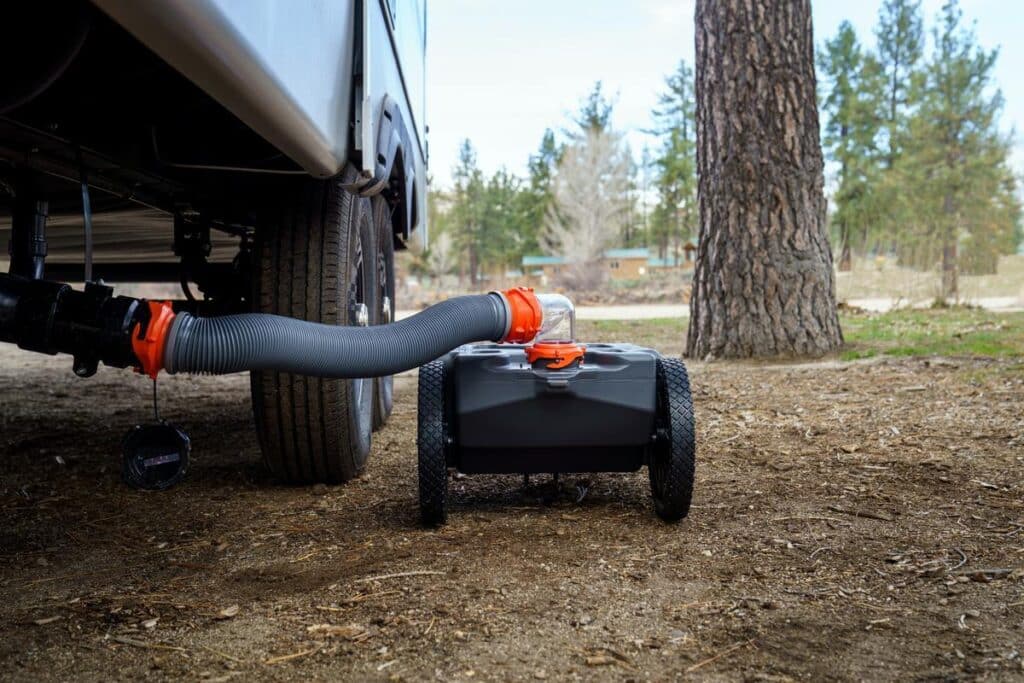
Step 1: Empty Waste into the Portable RV Holding Tank

- Connect a 90-degree clear elbow to the fill opening on top of the tank. A clear elbow is recommended to see when the tank is close to its capacity.
- Attach one end of the flexible 3-foot sewer hose to the clear elbow and the other to the termination outlet for your RV holding tanks.
- Open the portable waste tank’s vent and empty your holding tanks into your waste tote the same way you’d empty them at a dump station – black water first, then gray water.
- Close your holding tank gate valves and screw the portable waste tank’s vent shut before detaching the sewer hose from the tank termination outlet. Cap the outlet before proceeding.
For dump tanks with one 3-inch opening:
If your tank has one three-inch opening, use that to fill it, seal it during transport, and empty it at the dump station.
Detach the sewer hose completely and cap both openings (on your RV and the portable tank). Cap the 3-foot sewer hose before transporting it, and the tank, to the dump station.
For portable sewer tanks with two 3-inch openings:
If your tank has two three-inch openings, the top opening is your tank fill, and the side opening is for dumping the tank. Connect the detached end of the sewer hose to the dump opening on the side and leave the clear elbow and the other end of the hose connected to the fill opening.
Step 2: Move the Tote Tank to the Dump Station

Most portable RV waste tanks can be rolled to the dump station by hand, depending on their weight. The tow adapter comes in handy as an extension for the front carry handle.
For heavier tanks or longer trips, the tow adapter also slips over a tow hitch, allowing you to pull the RV sewer caddy to the dump station. This should always be done only at slow speeds – a recommended max of 5 MPH.
If you must travel a longer distance, carefully secure your portable sewer tank in an open truck bed so it doesn’t move during transit.
Step 3: Empty the Portable RV Dump Tank

Position the tote tank near the dump station’s in-ground sewer inlet.
For portable sewage tanks with one opening:
- Remove the fill opening cap and attach one end of the sewer hose.
- Attach your 90-degree clear elbow connector and 4-in-1 adapter to the other end and screw or place the connector into the dump inlet.
- Open the vent on the tote tank and lift the end opposite the fill opening to empty it. You may need to lower and raise the tank several times to empty it completely.
For waste totes with two openings:
- Detach the sewer hose and 90-degree connector from the tank’s fill opening and cap the fill opening.
- Attach the 4-in-1 adapter to the 90-degree connector and screw or place the connector into the dump inlet.
- Open the waste tank vent and pull the handle on the dump opening to empty its contents. As the level drops, you may need to tilt your tank to empty it completely.
How To Clean a Portable RV Waste Tank

Rinsing out your portable RV waste tank is the final step in proper use. Do this while your sewer hose is still connected and, for tanks with two-openings, ensure the side gate valve remains open.
- Remove the waste tank vent cap and attach the female-to-female drain hose adapter.
- Connect the dump station’s rinse-water hose to the adapter, then turn it on to let fresh water flow through your tank.
- Rock your tank gently back and forth to dislodge waste particles.
For portable septic tanks with one opening:
Partially fill the tank, shut off the water, and tilt it to rinse and drain.
For portable waste tanks with two openings:
It may help to close the side gate valve, fill the tank halfway, then rock it back and forth before opening the valve and draining the tank.
When you see clear water flowing through the clear 90-degree elbow connector, shut off the water, disconnect the rinse hose and hose adapter, and replace the tank vent cap. Tilt your tank to remove any remaining water. The tank should be completely empty before closing the gate valve (if applicable), removing the sewer hose accessories, and capping all tank openings.
Final Tips for Using a Portable Waste Holding Tank
Here are a few more things to consider when dumping RV tanks into a portable sewer tote:
- Clean all sewer accessories after each use.
- Even the best portable RV dump tanks typically hold less waste than built-in RV holding tanks. You may need multiple trips to completely empty tanks.
- Read the manufacturer’s instructions before towing your portable waste tank behind your truck to ensure safe, sanitary transportation.
Use these additional resources for understanding camper plumbing and safely handling RV waste:
Do you have any questions about using a portable RV waste tank? Let us know in the comments below.


