HOW WELL do you know camper parts and RV components? If you’re a new owner or shopping for your first RV, knowing your camper’s anatomy gives you the foundation to maintain it properly and protect your investment. Plus, earning you valuable street cred when talking shop with campground neighbors.
Knowing how to identify the different parts of an RV will help you truly relax and enjoy your first camping adventures.
Key Takeaways
- Distinguish “The House” from the Chassis: Understand that your RV consists of two distinct parts: the chassis (the mechanical frame and engine) and “the house” (the living structure), each with its own unique maintenance needs.
- Master the Core Utility Systems: Familiarize yourself with how the electrical (AC/DC), plumbing (fresh, gray, and black tanks), and propane systems function to manage resources effectively and troubleshoot issues on the road.
- Learn Component-Specific Functions: Recognize the critical differences between similar parts—such as stabilizing jacks vs leveling systems and converters vs inverters—to ensure you operate your equipment safely and correctly.
The Structure
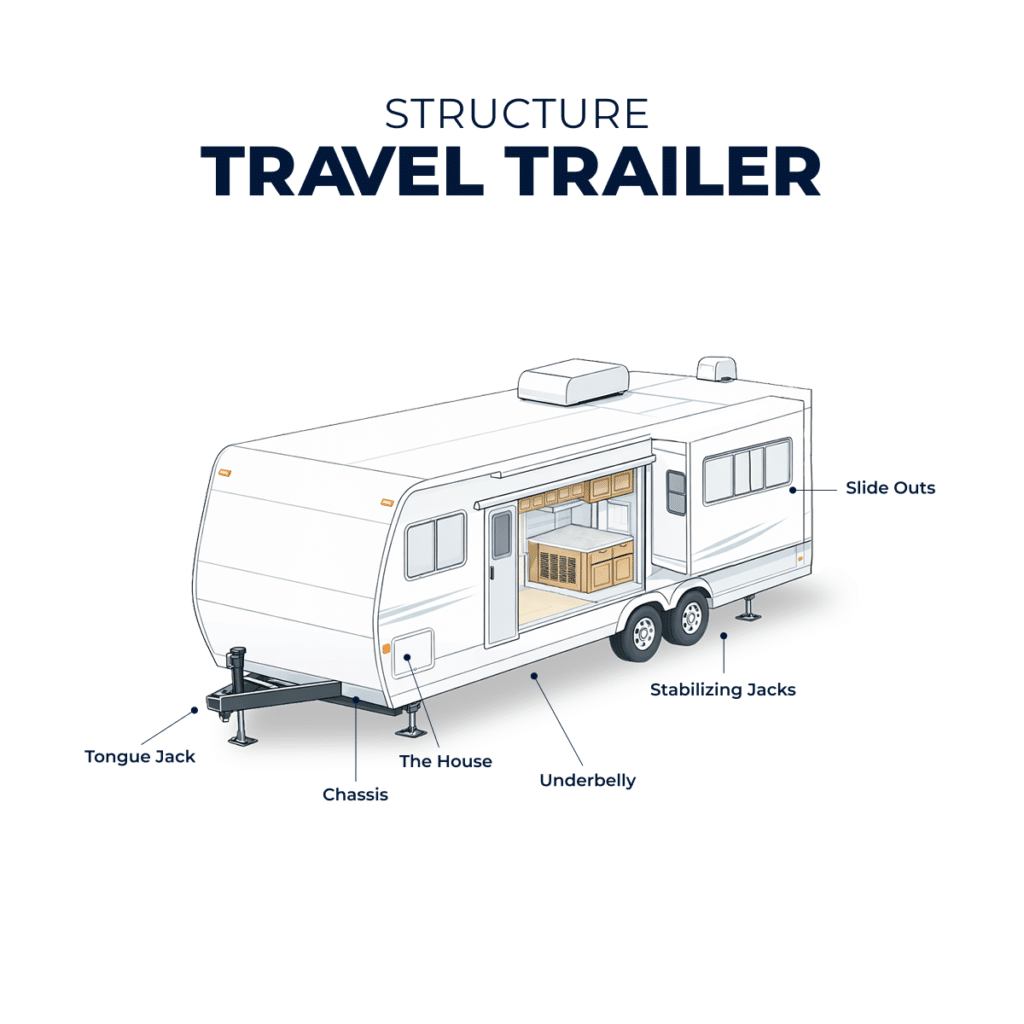
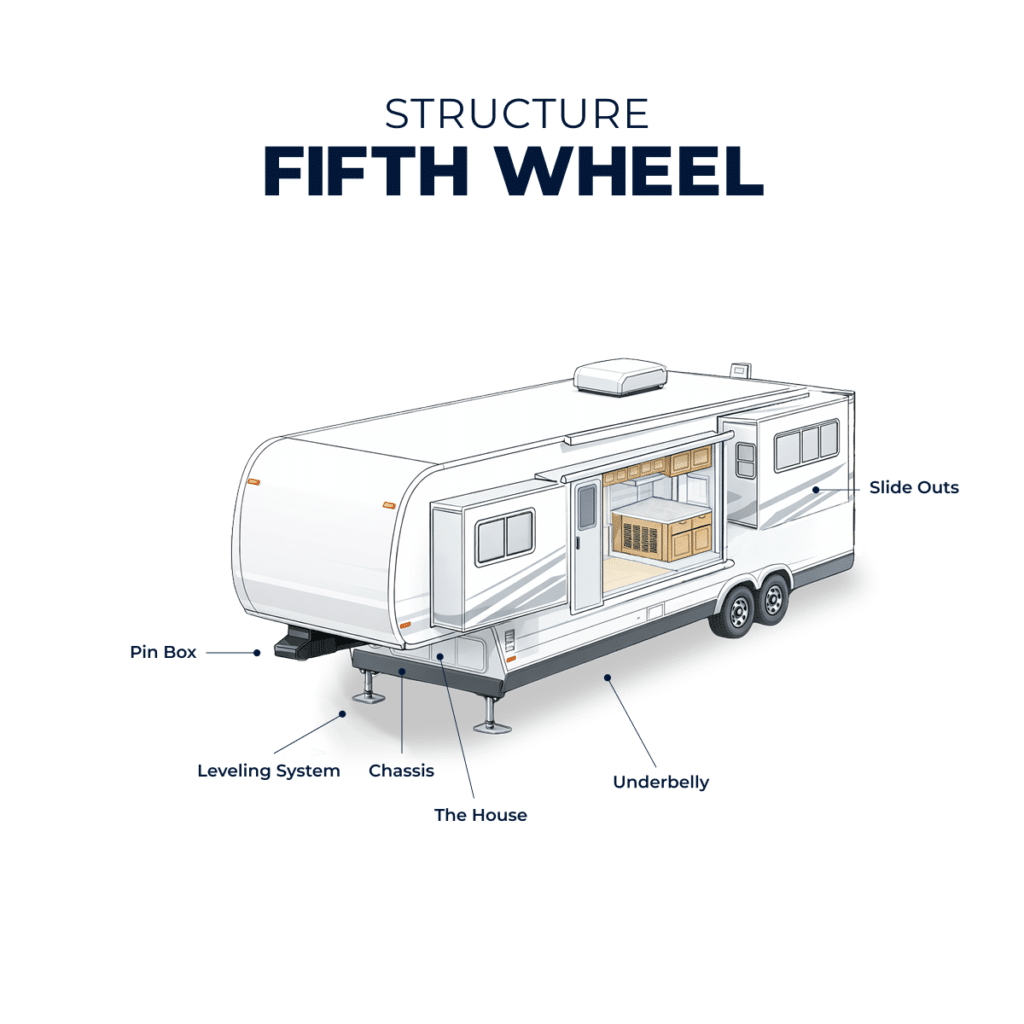
Images by Camping World
Let’s begin with the structure, or foundation, if you will.
Chassis vs “The House”
Every RV starts with a chassis. This is the frame, tires, axles, suspension parts—and engine, for motorhomes—that everything else sits on. This is the machine space.
“The house” is the structure built on top of the chassis. It includes the floor, sidewalls, front and rear caps, and RV roof components. This is the living space.
Slide-outs
Slide-outs, also known simply as slides or slide rooms, are the motorized wall sections that extend out to expand the interior living space. Common RV slide-out components include the slide room itself, the electric or hydraulic motor, support rollers, drive mechanisms, rubber seals, and electronic control systems.
Stabilizing Jacks vs Leveling Systems
All towable campers (and some motorhomes) are equipped with stabilizing jacks or a leveling system. Rare models feature both. These common RV landing gear parts feature “legs” that extend from the chassis to the ground, usually at the front and rear, to provide additional points of contact that make the RV more stable when parked.
Here’s how they differ:
Stabilizing jacks are meant to be extended until they touch the ground, but no further. They are NOT meant to lift the camper.
Leveling systems extend to the ground and raise or lower the RV—front, back, left, right—to provide leveling and stabilization.
Tongue Jack
Found on all towable campers besides 5th wheels, the tongue jack raises or lowers the front of the trailer for connecting to a tow vehicle’s hitch and adjusting the trailer’s front-to-back level.
Pin Box
Specific to 5th wheels, the pin box is the hitch box secured to the underside of the chassis’ upper deck. It includes the king pin that secures to the 5th wheel hitch for safe towing.
Underbelly
This is the underside of the chassis. Many manufacturers now include underbelly enclosures—typically semi-rigid panels—to provide additional weather and road protection for systems like holding tanks, plumbing lines, and electrical wiring.
Those critical components make up the basic structure of most campers, but now let’s talk about what powers them.
Electrical
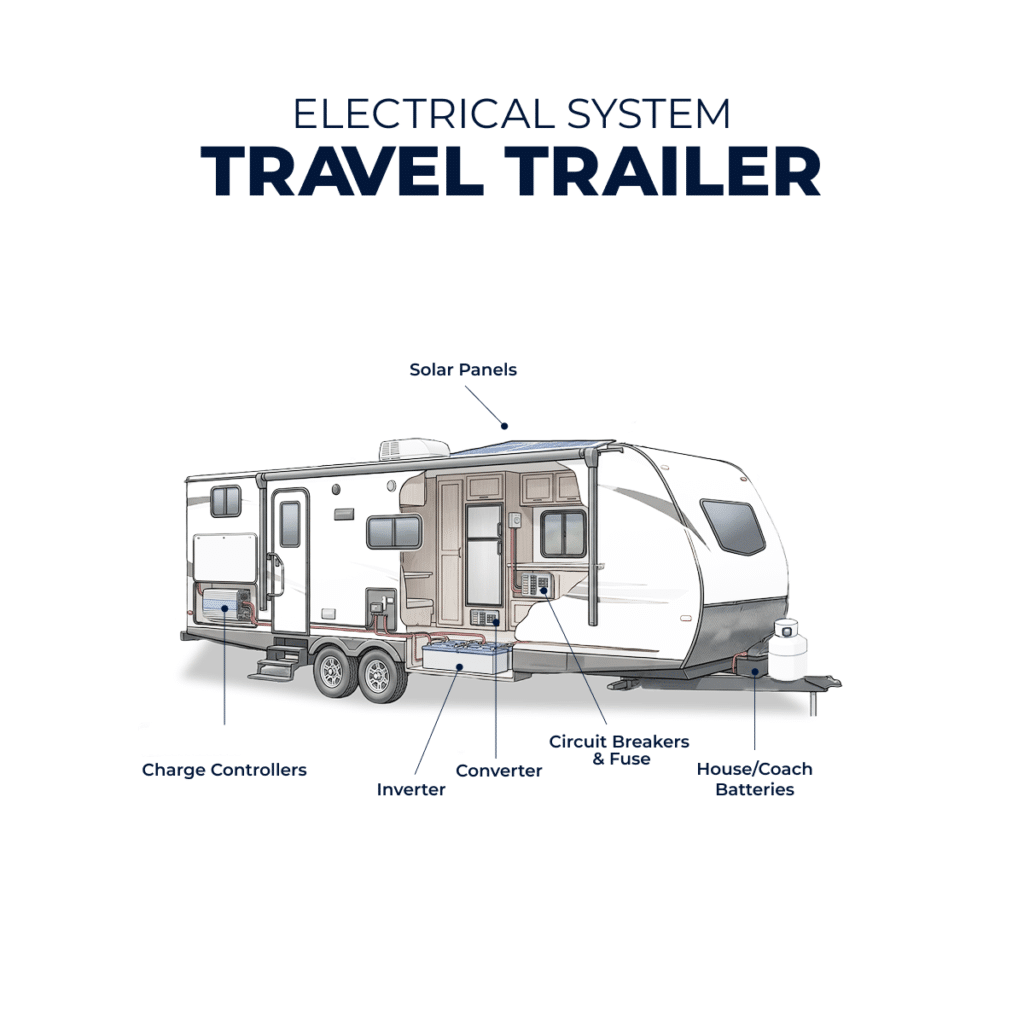
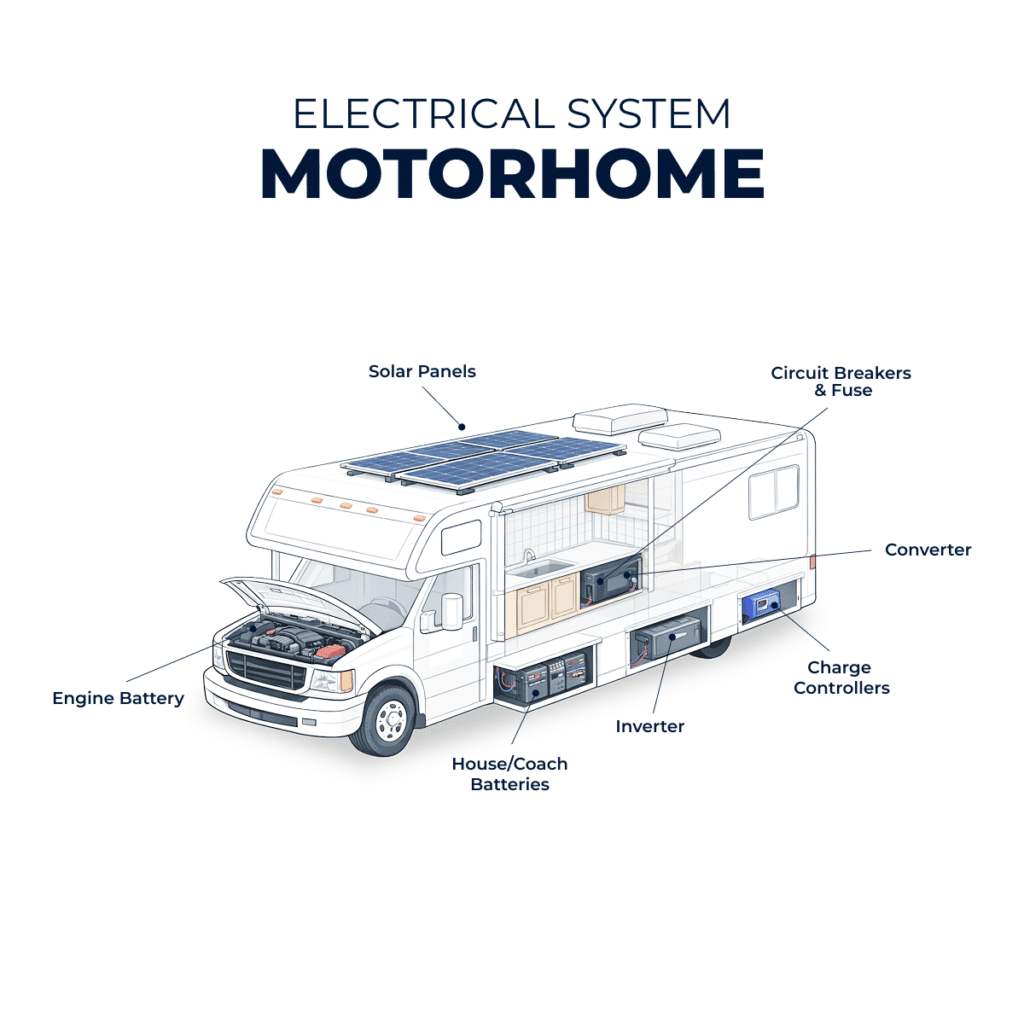
Images by Camping World
Next, let’s define the most common RV electrical components.
House/Coach vs Engine Batteries
Towable campers will only have house batteries (aka coach batteries), which are typically located on the trailer tongue or in a storage compartment. These batteries provide 12-volt power to the RV’s lights and other 12-volt RV electrical components.
Motorhomes also have engine batteries that specifically provide the starting amperage for the engine, along with other critical chassis components.
Converter vs Inverter
All RVs are built with a factory-installed converter. A converter turns AC shore power into DC power to charge your batteries.
Many RVs are now prepped for an inverter, if it’s not included from the factory. An inverter converts DC battery power to AC, allowing you to use compatible appliances and properly wired outlets when you aren’t plugged in.
Circuit Breakers and Fuses
Like a house, breakers control the heavy-duty AC appliances (air conditioner, microwave). Fuses (like in a car) protect the DC system (lights, water pump, fans). Every RV has an electrical panel with the breakers and fuses accessible via a flip-down panel for easier electrical troubleshooting.
Solar Panels & Charge Controllers
Solar panels—typically roof-mounted—and charge controllers—typically mounted on an interior wall or in a basement compartment—are now standard on many RVs. From the factory, most solar packages are designed to provide trickle charging that protects your battery from draining too far while in storage. Most systems require battery and/or inverter upgrades, the installation of a capable inverter, and the addition of extra panels to truly extend off-grid capability.
Plumbing
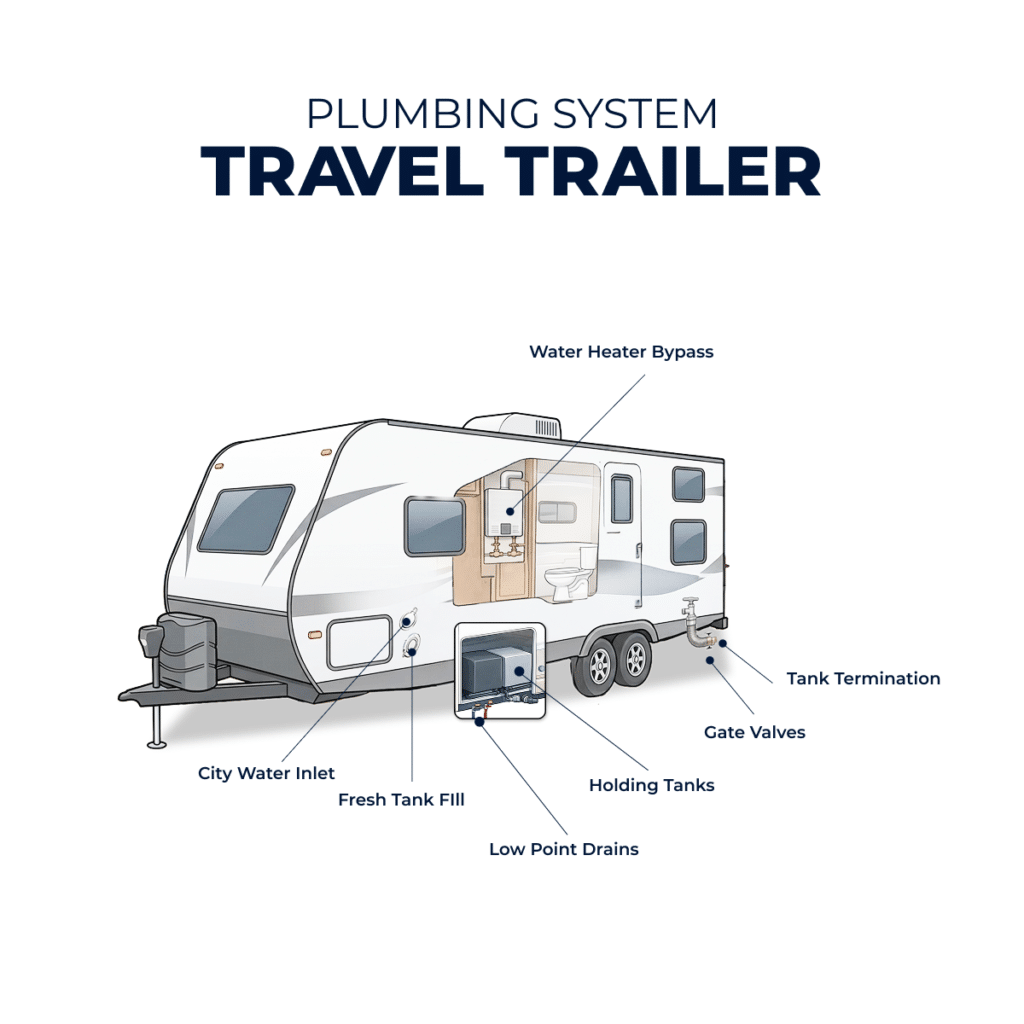
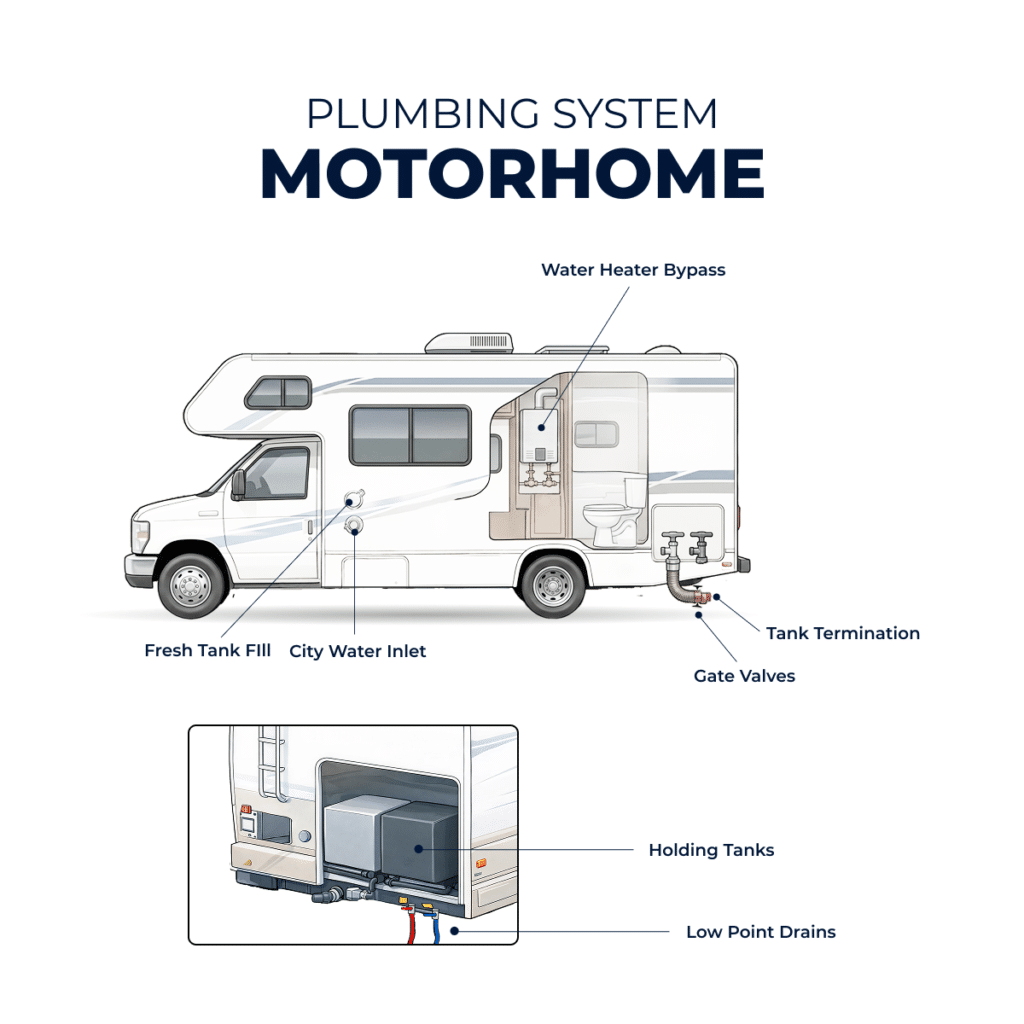
Images by Camping World
Next, let’s define the basic plumbing and RV water system components.
Holding Tanks
Mounted underneath the chassis, most RVs have at least three holding tanks: one for fresh water, one for gray water from sinks and showers, and one for black water from toilets. Their varying capacities dictate how long a given RV can go between visits to the dump station for tank emptying.
City Water Inlet vs Fresh Tank Fill
There are two ways an RV gets water:
- By connecting a hose to a spigot
- By filling the onboard fresh water tank
Your RV’s city water inlet and fresh tank fill are both found on the outside of the RV, typically on the driver’s side or back wall, but sometimes in a storage compartment.
The city water inlet is used to connect a potable water hose from the spigot, evidenced by its female hose fitting.
The fresh tank fill is used to set a hose into for filling the onboard fresh water holding tank, evidenced by its enlarged opening to fit the male end of a drinking water hose.
Tank Termination(s) & Gate (or Dump) Valves
Located downstream of the gray and black holding tanks, the tank termination is the round opening covered by a removable cap, where you connect a sewer hose and fittings to empty the tanks.
The gate valves are the T-handled levers that control the flow of waste from the tanks once the hose is secured and properly routed to a dump station. Even when camping with full hookups, these valves should be closed until it’s time to actively empty the tanks.
And here’s a pro tip: always empty the black tank first, followed by the gray.
Low Point Drains
Most campers have at least three low-point drains. Two of them are the lowest points in your plumbing lines—hot and cold, respectively. The third is the lowest point in your fresh water holding tank. All three are in place to help you gravity-drain as much water as possible from the potable water system, helping minimize the risk of microbial growth, leaks, and freezing in cold temperatures.
Water Heater Bypass Valve
Specific to traditional tank-style water heaters and some tankless models, a bypass valve is located on the back of the heater—sometimes requiring the removal of a panel for access. This valve diverts water around the heater and is crucial for winterizing to prevent antifreeze from filling the heater’s tank.
Propane & HVAC
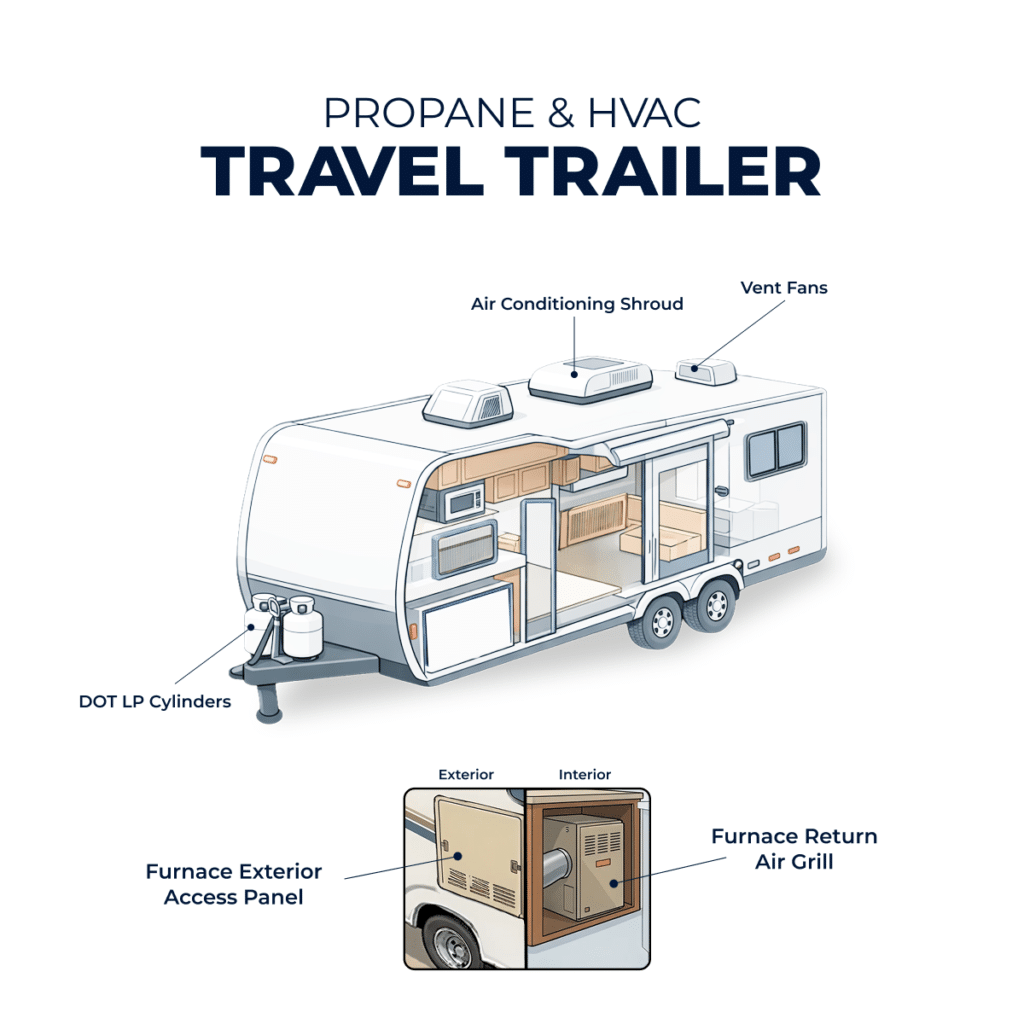
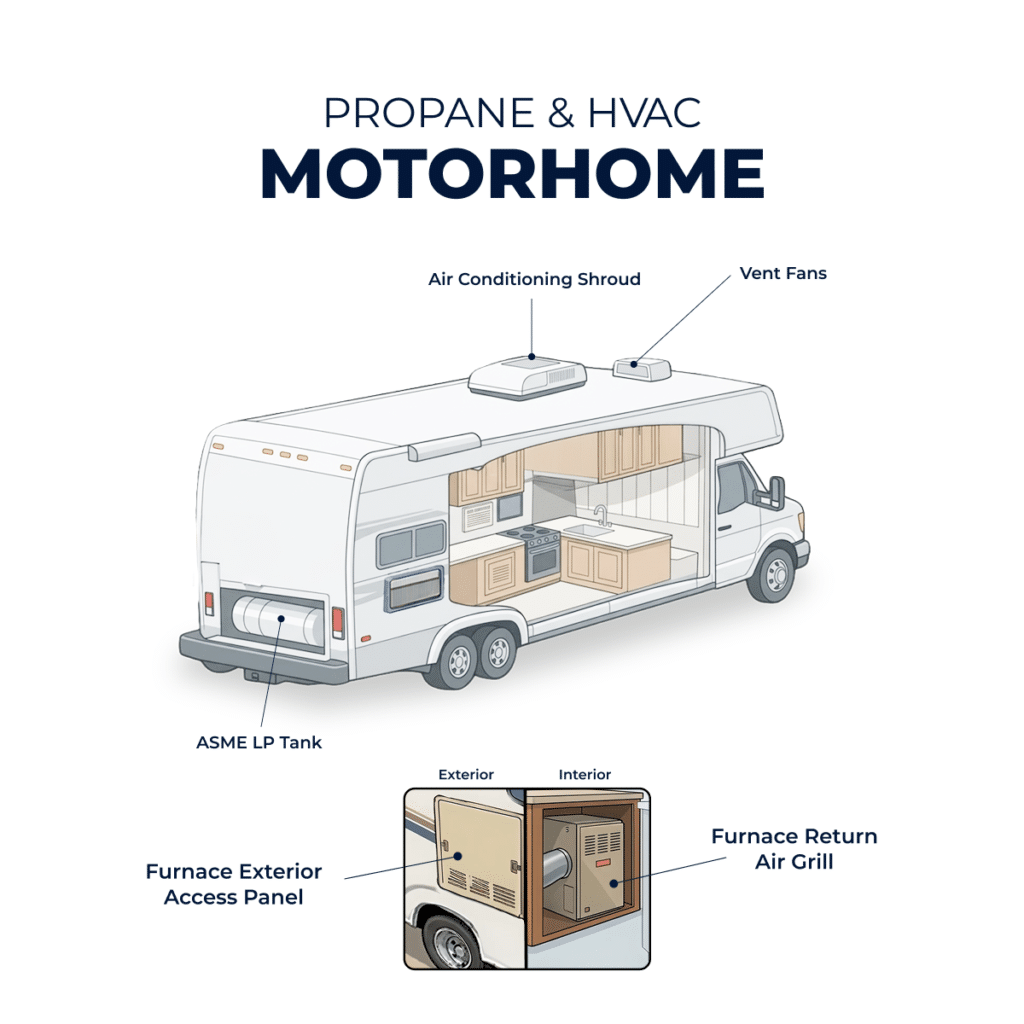
Images by Camping World
Finally, we’ll wrap up with explanations of the basic RV parts in propane and heating/cooling systems.
LP Cylinders vs Tanks
LP, or liquid propane, is the fuel source for appliances like your stovetop, water heater, and furnace.
DOT-certified LP cylinders (aka bottles) are found on towable campers, usually on the tongue or in small exterior compartments. Their capacities typically range from 20 to 40 pounds.
ASME-certified LP tanks are found on motorhomes. These are usually mounted to the chassis and typically offer much higher propane storage capacities.
Furnace
The furnace is the primary source of propane-burning heat in an RV. Locations vary by RV type and floor plan, but the furnace is typically found by locating the access panel and/or vent on the outside, or the return air grill on the inside.
Air Conditioner
Most RVs feature roof or wall-mounted air conditioning systems. Systems also vary from ducted to non-ducted, and larger RVs typically offer multiple roof-mounted units to provide zoned interior cooling.
In addition to identifying the air conditioner by its shroud or cover on the roof or sidewall, its location can be found by locating the interior RV AC components, such as the ceiling assembly with the return air filter and grille, the quick-cool register, and, sometimes, the control knobs.
Vent Fans
Easily spotted by their square openings in the ceiling inside your RV, roof vent fans provide ventilation, removing cooking or bathroom odors and aiding the movement of cool or warm air throughout your RV.
We hope this basic guide to common RV parts and accessories helps you become more familiar with your camper’s anatomy. Here are some additional resources:
- Safety Tips for Towing RV Trailers
- Expert Camper Cleaning Tips
- What Are Good RV Tires?
- RV Safety Accessories
Do you have any questions about the parts of a camper? Let us know in the comments below.


